|
 Now you will need some sheets of poster paper. These will be
used to form a "seamless" background for your merchandise to be
photographed on. If you can get the paper in a roll, that would be great.
Some photography stores sell background paper in rolls they call it
"seamless" paper. You can use any color you want, but I
recommend getting black and white. The paper needs to be wide enough to
cover the table width of the table and long enough to cover the length of
the table and go 2 to 3 feet up the wall, or higher than the height of the
object being photographed (See graphic #2). You can tape the paper to the
wall and tape the edges to the table. The paper can curve where the wall
and the table meet. Now you will need some sheets of poster paper. These will be
used to form a "seamless" background for your merchandise to be
photographed on. If you can get the paper in a roll, that would be great.
Some photography stores sell background paper in rolls they call it
"seamless" paper. You can use any color you want, but I
recommend getting black and white. The paper needs to be wide enough to
cover the table width of the table and long enough to cover the length of
the table and go 2 to 3 feet up the wall, or higher than the height of the
object being photographed (See graphic #2). You can tape the paper to the
wall and tape the edges to the table. The paper can curve where the wall
and the table meet.
 To light the merchandise on the table, I use two
"Swing arm desk lamps" these are inexpensive lamps that are
available at most hardware stores. The clamp on version (not shown) cost
about $6 to $10 each. The version with a base (See graphic #3) run about
$20 each. I use the clamp on lamps. I screw them onto the edge of the
table at the front of the table. Make sure you get the metal version of
these lamps and that they are rated for at least 100 Watts each. The
plastic lamps will melt. Get 2, 100 watt spot light bulbs. Spot lights
will give you more control over where you can point your light. Place your
item to be photographed in the center of the table. Then adjust the lights
so that they are pointing toward the front of the item. Attach the lamps
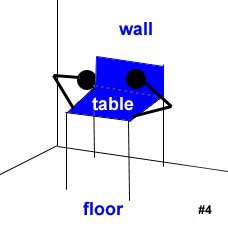
to the side front edges of the table as shown in graphic #4. The arms on
the lights are very easy to adjust. Remember you have 2 lamps to work
with. I usually set the lamps so that they are pointing from the front of
the table toward the back. To light the merchandise on the table, I use two
"Swing arm desk lamps" these are inexpensive lamps that are
available at most hardware stores. The clamp on version (not shown) cost
about $6 to $10 each. The version with a base (See graphic #3) run about
$20 each. I use the clamp on lamps. I screw them onto the edge of the
table at the front of the table. Make sure you get the metal version of
these lamps and that they are rated for at least 100 Watts each. The
plastic lamps will melt. Get 2, 100 watt spot light bulbs. Spot lights
will give you more control over where you can point your light. Place your
item to be photographed in the center of the table. Then adjust the lights
so that they are pointing toward the front of the item. Attach the lamps
to the side front edges of the table as shown in graphic #4. The arms on
the lights are very easy to adjust. Remember you have 2 lamps to work
with. I usually set the lamps so that they are pointing from the front of
the table toward the back.
Each lamp being at a 45 degree angle (See graphic #5)
Adjust their position until the item being photographed is well lit. Don't
forget, you can also change the color of the background paper as well. The
one big problem with using regular spot lights is that the digital camera
or the film you are taking the pictures with will give the items
photographed a yellowish glow. You can compensate for this with the
software you are using, but this takes time. The easy way to fix this is
to put a filter on the camera called an 80A filter. This filter screws
onto the front of your camera lens. If you can't find the filter, you can
also use photographic "Gels" that you place over the spot
lights. This will give the light a blue tint, which will get rid of the
yellow in your pictures. Gels are made of a heat resistant plastic. They
are available at most photo stores. You can use paper clips or clothes
pins to attach them to the front of your lamps. Don't use tape, it will
melt or start a fire.
 Make sure the camera is in focus. Make sure the the item
being photographed takes up most of the view finder you are looking
through. Make sure the camera is in focus. Make sure the the item
being photographed takes up most of the view finder you are looking
through.
If you have more ideas concerning this subject,
comments, or suggestions for future topics, we want to hear them.
Please email us at support@tias.com.
|